ISO 4042 Specification
This annex gives guidance for the evaluation of the surface areas of bolts, screws and nuts
which are needed for the determination of the batch average thickness according to
informative annex D.
NOTE : The surface areas given in Tables G.1 and G.2 apply only if agreed between the
parties
concemed.
- Surface areas of bolts and screws
- Surface areas of hexagon nuts style 1
Bolts and screws
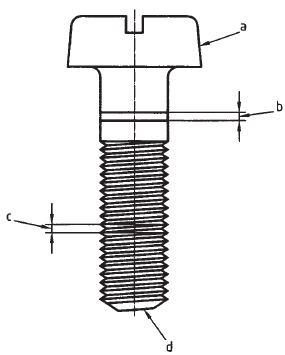
To obtain the total surface area of a bolt or screw the following parameter values are
necessary (see Figure G.1):
--- the surface area A, of a length of 1 mm of the threaded shank of the bolt or screw;
--- the surface area A₂ of a length of 1 mm of the unthreaded shank of the bolt or
screw;
--- the surface area As of the head (including surface of the end face).
The total surface area A is then calculated as follows:
A = A1 x thread length + A2 x shank length + A3

Figure G.1 Surface area
a Total surface area of the head including surface area of the end face, see
d
b Surface area of the shank of 1 mm length.
c Surface area of the threaded part of 1 mm length.
d Surface area of the end face is included in the surface area of the head
A3
If the thread is cut, the unthreaded shank will be approximately equal to the basic
major diameter (nominal diameter). If the thread is rolled, the unthreaded shank will be
approximately equal to either the pitch diameter (reduced shank) or the basic major
diameter (full shank).
Table gives values for the surface areas A1, A2 and A3
for different shank and head
types.
| Thread size (coarse thread) |
Area per millimetre length | Area of head,A3 | ||||||
|---|---|---|---|---|---|---|---|---|
| Threaded shank,A1 (coarse thread) |
Unthreaded shank,A2 | Flat countersunk head | Raised countersunk head | Pan head | Cheese head | Hexagon head | ||
| M1,6 | 7,34 | 5,03 | 4,32 | 20,4 | 22,1 | -- | 19,3 | 29,7 |
| M2 | 9,31 | 6,27 | 5,44 | 32,6 | 35,5 | -- | 32,0 | 47,1 |
| M2,2 | 10,21 | 6,91 | 5,99 | 37,8 | 40,9 | -- | 37,3 | -- |
| M2,5 | 11,81 | 7,85 | 6,91 | 49,9 | 54,1 | 56,4 | 47,0 | 72,2 |
| M3 | 14,32 | 9,42 | 8,36 | 66,7 | 72,2 | 78,3 | 72,8 | 91,0 |
| M3,5 | 16,65 | 11,00 | 9,75 | 85,8 | 93,0 | 110,4 | 91,4 | -- |
| M4 | 18,97 | 12,57 | 11,10 | 118,8 | 128,6 | 144,9 | 120,3 | 152,9 |
| M4,5 | 21,49 | 14,15 | 12,55 | 128,1 | 138,6 | 182,2 | 162,1 | -- |
| M5 | 23,98 | 15,70 | 14,02 | 167,7 | 181,6 | 225,2 | 184,1 | 297,7 |
| M6 | 28,62 | 18,85 | 16,71 | 241,8 | 261,2 | 319,6 | 258,3 | 312,2 |
| M8 | 33,48 | 25,15 | 22,43 | 429,8 | 464,6 | 577,9 | 439,4 | 541,3 |
| M10 | 48,31 | 31,42 | 28,17 | 671,5 | 725,8 | 901,8 | 666,0 | 905,8 |
| M12 | 58,14 | 37,63 | 33,98 | 990,5 | 1064 | -- | 864 | 1151 |
| M14 | 67,97 | 43,99 | 39,45 | 1257 | 1357 | -- | 1158 | 1523 |
| M16 | 78,69 | 50,27 | 45,67 | 1720 | 1859 | -- | 1509 | 1830 |
| M18 | 87,63 | 56,54 | 50,88 | 2075 | 2240 | -- | 1913 | 2385 |
| NOTE: For the time being values for bolts and screws with sizes > M18 or with fine pitch thread are not available and should be calculated as appropriate. | ||||||||
Nuts
Table gives the surface areas of hexagon nuts style 1.
The effective surface area of a nut for the purpose of electroplated coating application
is normally less than its actual geometrical area because of the difficulty in attaining
uniform distribution of the coating over the internal threads, the majority of the
coating being on the first thread at each end.
For the purpose of this annex, therefore, the calculation of the surface area of a nut
has been based on a solid piece in the shape of the nut but neither drilled nor tapped.
| Thread size | Surface area A | |
|---|---|---|
| M1,6 | 32,2 | |
| M2 | 49,7 | |
| M2,2 | -- | |
| M2,5 | 77,4 | |
| M3 | 95,9 | |
| M3,5 | -- | |
| M4 | 163,2 | |
| M4,5 | -- | |
| M5 | 221,3 | |
| M6 | 345,8 | |
| M8 | 585,8 | |
| M10 | 971,0 | |
| M12 | 1282 | |
| M14 | 1676 | |
| M16 | 2078 | |
| M18 | 2678 | |
| NOTE: For the time being values for nuts with sizes > M18 and nuts of style 2 are not available and should be calculated as appropriate. | ||